What is a CMOS Battery: How to Remove & Replace in a Laptop?
What is a CMOS battery? How to know that the CMOS battery is dead? How to remove the CMOS battery? We’ll take look at these questions and find solutions for them in this article.
If you are using laptops and PCs for many years, you may notice the computer malfunctioning. If you are facing problems in booting, date and time resets after every reboot and many other problems, then the CMOS battery in your laptop is dead.
What is a CMOS Battery?
A complementary Metal Oxide Semiconductor (CMOS) is a chip in the motherboard that contains BIOS configuration, date, time, and other information that the computer needs during startup.
Hence this should be supplied the power continuously as those programs should be operational even if the computer isn’t plugged into a power source.
The CMOS battery is used to supply power continuously even when the computer is shut down. We’ll find CMOS batteries in both PC and laptops.
This gets charged whenever the computer is plugged into a power source. PCs are plugged into a power source for a longer time than a laptop. So, the more we leave the laptop plugged in, the longer our battery will last.
Now let us see how to remove the CMOS battery in a laptop? You can read the step-by-step guidelines or watch the full video given below to see how to remove the CMOS battery?
Here’s the simple way to remove and replace a CMOS battery on a laptop. For this, we require a screwdriver (Philips or flathead), Compressed air, a New CMOS battery, and an ESD mat.
1. Firstly, we need to have a good workspace. As the laptop can be damaged by electrostatic discharge, we should make sure we work on a flat and hard surface and not on a carpeted surface. It’s best to work on conductive foam and wear an anti-static band to avoid static electricity in hand.
2. Shut down the laptop and make sure to unplug all kinds of connections from the laptop including power and others.
3. Remove the case of the laptop’s backside by unscrewing it.
4. We may have to remove the battery (long, heavy, and brick-shaped) to avoid the laptop from accidentally turning on.
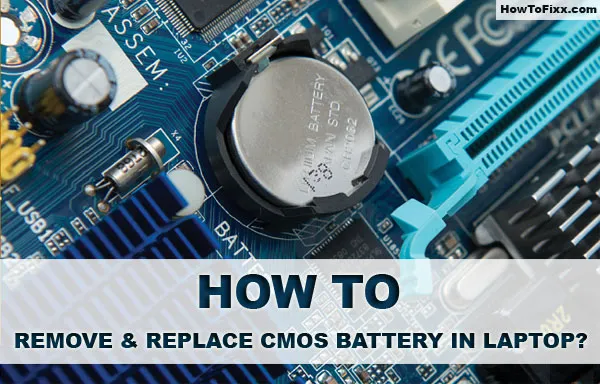
5. We’ll see the motherboard and then we see a shiny-round CMOS battery. Remove the CMOS battery from the socket. We have to be very careful while doing this, a small error could cause a huge problem in the motherboard.
6. Insert the new CMOS battery in the same location and the same orientation as the old one.
7. Then reinstall the battery and re-screw the inner casing(s) and replace the external casing.
8. Now plug the laptop into the power source. By now BIOS should have defaulted back to the original and even if the date and time are incorrect and drivers are missing, nothing to worry we just need to reset the date and time once and reinstall the drivers.
There’s no need to take the laptop to service centers to replace CMOS when we could do it all by ourselves, which could save us money and time.


 Previous Post
 Next Post