Confused about how to take a screenshot on a Windows 10 laptop? Well, I am here to help you out. There are many ways to capture a screenshot on your Windows 10 PC, but different windows have different processes.
Taking screenshots on your Windows 10 laptop or computer is a useful feature. It can be helpful to record and capture the screen to share with people. It also helps working professionals and students to use the information with much ease.
You can also use it to highlight any software error or bug you have experienced. With the updating technology and shift toward mobile computing, it has become a complicated task for most of the users out there to even take a simple screenshot.
Many have lost the touch, to use the keyboard and take screenshots. But fret not, we’ve got you covered! Below are the ways listed to take screenshots on Windows 10. The steps are simple and easy to get used to.
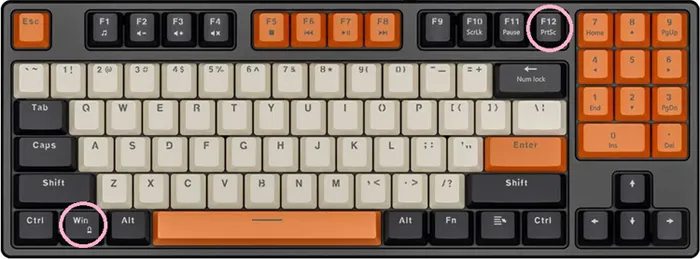
The easiest and fastest way to capture the screen on a Windows 10 is the PrtScn key. You can capture the entire screen, you just have to press the PrtScn key on the keyboard.
Now you can paste the screenshot into the paint, word document, PowerPoint, etc. This is the most common way to take screenshots.
2. Windows + PrtScn key:
To take the screenshot on Windows 10 of a current Window press the Windows + PrtScn. The file will automatically be saved. The screen will go dim and the screenshot of your entire screen will be saved to the Pictures > Screenshot folder.
This is the oldest way to take a screenshot. You just have to press Ctrl + PrtScn. It copies the current window which can be further pasted on apps for further use.
4. Windows key + Alt + PrtSc:
This is the quickest way to capture a screenshot on Windows 10 by hitting the Windows key + Alt + PrtSc. It saves the screenshot in a designated folder named Captures. It saves the screenshot directly as an image without any alterations.
5. Windows key + Shift + S:
This is the best trick available on Windows 10 to capture the contents of the Window. By pressing the Windows key + Alt + PrtScn keys you can screenshot the contents of the window. You can save the captured picture to any desired location and share it on apps like Instagram, Mail, or Messenger.
This is a quick method to take a screenshot on the active Window. You just have to press Alt + PrtScn. You will have to save it to another program to save it.
7. Snipping Tool:
The Snipping Tool is one of the default applications of Microsoft Windows. It is the most widely used screenshot Tool. Microsoft itself developed it.
Using the Snipping Tool will make your screen dull, and you will select the part of the screen you want to capture with the help of a cursor.
8. Snagit:
You can capture the entire desktop screen or a window with Snagit’s All-in-one capture which allows you to take a snapshot or record a video.
Open the capture window and go to the notification area, by clicking the ^ arrow, click on the Snagit icon.
Choose the screen capture settings and click on the capture button. This will capture the screen that is active.
This is applicable only if you have a Snagit editor installed.
Snip & Sketch is the best way to screenshot on Windows if you are looking to customize, annotate or share your screenshots. This is easy to use when compared to the old Snipping Tool.
You can open Snip & Sketch by pressing the Window key + Shift + S on the keyboard.
Snip & Sketch can be easily found in the start menu and notification area.
10. Power+Volume Up:
To capture a screenshot with Microsoft Surface on Windows 10 you need to press the Power button along with the Volume Up key. The screen will go dim and the screenshot will be saved to the device, in the Screenshot folder.
11. Windows Game Bar:
The Game bar feature in MS Windows allows you to snap screenshots while you are playing any game. You need to press the Window key + G key on the keyboard together to capture a picture.
If you are a Surface pen user you can capture pictures in a cool way. Double-clicking on the back button of the pen, the Snap & Sketch menu will pop up on the surface device and you can capture the screen.
13. Using Greenshot:
Greenshot is a free screenshot program that captures the screen when enabled. It is free to download software and allows all the essential features which the screen recording software does.
14. Using ShareX:
ShareX is a free-to-download program that works with Windows 10. It has a range of features rather than a typical screen recorder, users can also store their screenshots on the cloud account and can access them across the devices.
It is free to download screenshots and recording software. Jing lets the user take screenshots with just a few clicks. Unlike other software, Jing takes time to download and install. But, once installed it is pretty much simple and easy to use.
")
 Screenshot Software for Windows PC")
")
")


 Screen Recorder for PC You Can Download in 2022")
%27%20fill-opacity%3D%27.5%27%3E%3Cellipse%20fill%3D%22%231b0f28%22%20fill-opacity%3D%22.5%22%20rx%3D%221%22%20ry%3D%221%22%20transform%3D%22rotate(178.3%202%2021)%20scale(29.56782%2063.97664)%22%2F%3E%3Cellipse%20fill%3D%22%23fc733a%22%20fill-opacity%3D%22.5%22%20rx%3D%221%22%20ry%3D%221%22%20transform%3D%22rotate(-56.9%2081.6%20-62.6)%20scale(53.48532%2041.15171)%22%2F%3E%3Cellipse%20fill%3D%22%23d7980a%22%20fill-opacity%3D%22.5%22%20rx%3D%221%22%20ry%3D%221%22%20transform%3D%22matrix(-37.29638%2018.76842%20-10.00102%20-19.87391%20118.7%2043)%22%2F%3E%3Cellipse%20fill%3D%22%23777637%22%20fill-opacity%3D%22.5%22%20rx%3D%221%22%20ry%3D%221%22%20transform%3D%22rotate(167.8%2066.7%2045.3)%20scale(38.4842%2023.52729)%22%2F%3E%3C%2Fg%3E%3C%2Fsvg%3E "Download Xiaomi (MI) PC Suite for Windows PC (Update & Backup)")
")
 Screenshot Software for Windows PC")
")

")


 Screen Recorder for PC You Can Download in 2022")
 PC Suite for Windows PC (Update & Backup)")

 Previous Post
 Next Post